Making your own dishwashing liquid

Recently I posted about one of our more successful DIY homesteading experiments: making your own laundry detergent. My review of today’s experiment is a little more mixed.

We don’t like to use disposable dishes, cups or cutlery, and we don’t run the dishwasher so much. With a family of five (and again, my 4-year-old son almost counts for two people in the mess-making department), we’re washing dishes, cups, cutlery, pots and pans all the time. So my husband looked for a way to make dishwashing liquid cheaply and found this video.

Basically, you get some of those little gel-packs of dishwasher detergent and put one in an empty dishwashing liquid bottle with some hot water to dissolve it. That’s it! It gets an A+ for simplicity, as homesteading stuff goes.

Now for the drawbacks: Though it’s good with grease, this homemade dishwashing liquid doesn’t make suds. Maybe it’s my own psychological problem, but I don’t think dishes are clean unless I’ve seen bubbles.

I solved that problem by adding a little bit of commercial dishwashing liquid to the bottle to make bubbles. I think if you keep a big box of the gel-packs on hand, and a small bottle of dish liquid just to add bubble-making ability, it’s a great way to save money.

And there’s a bonus: Those little gel packs do a great job in the dishwasher! The dishes, glasses and silverware actually come out without any streaks at all. So I do recommend making your own dish liquid, just be sure to add bubbles if you feel like you need them.

Southern-style Chicken and Dumplings recipe using pressure cooker

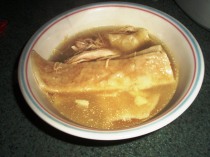
Bowl of chicken and dumplings

Chicken and dumplings are so delicious, hearty and warming on a cold winter night! (Okay, I admit it — I make this recipe all year round because it is a family favorite.) This is why I bought my pressure cooker in the first place, and this recipe has been in my husband’s family for over 100 years. (And in my recipe box for about 15 years!)

Why make chicken and dumplings? For one thing, it’s a wonderful way to make your chicken go further. It’s not health food, but as an occasional treat or a way to feed your family cheaply when the budget is tight, it is gold.

Once you know how to make chicken soup in a pressure cooker, adding homemade dumplings is not hard at all.

How to make chicken and dumplings – Southern style*

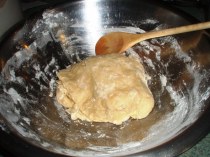
Dumpling dough

Dumpling dough

Make a batch of chicken soup in your pressure cooker using 2-4 chicken breasts. Remove the skin and bones and replace the chicken in the pot, and then add a chicken bouillon cube (or the equivalent in chicken soup mix) to the broth. I like to add garlic powder or fresh minced garlic, salt, and black pepper at this point, too.

For the dumplings, mix the following ingredients in a medium-large mixing bowl:

  • 2.5 cups flour
  • 1 tsp salt
  • 1 egg, beaten
  • 6 tbsp vegetable or canola oil
  • half a cup of water or broth (use water if the broth is too hot)

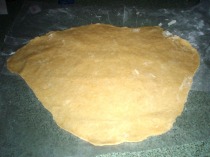
Mix all ingredients until the dough is a soft ball. Roll it out — I always use a couple of sheets of wax paper taped to the counter, because the dumpling dough rolls out BIG. The dough can also be quite stretchy, but that’s as it should be — just roll it out as thin as possible.

Let the dough dry for 20 minutes. Meanwhile, bring the soup back to a gentle boil.

Cut the dough in smallish strips and drop them into the boiling soup. Cover and cook slowly, stirring often, for about 20 minutes. At the end of cooking, mix in about 3 tsp. of flour mixed with water to make a paste – this will thicken the broth. (Leave out that last step if you prefer a clear broth.)

Dumpling dough rolled out

Dumpling dough rolled out

*Different kinds of dumplings

I am aware of the “true Southern dumpling” debate: should they be thin strips, like mine, or blobs of biscuit dough dropped in your soup? All I know is that my husband’s family is from Arkansas and, as I mentioned above, they’ve been making dumplings this way for a century. But it’s really all about what your family likes to eat!

My husband wanted me to add that these dumplings are very similar to the “Sweet Sue” brand canned dumplings. (Just homemade and, therefore, better.)

Want to try this recipe? Please comment and let me know how it turned out!

Book review: “The Wilder Life”

I went to our local library last week and, having found that every book on my list was either already checked out or was never there to begin with, I browsed the New Releases for inspiration. I came away with The Wilder Life.

I’d heard about The Wilder Life: My Adventures in the Lost World of Little House on the Prairie, by Wendy McClure, so I checked it out. I thought it was just a travelogue of places from Laura Ingalls Wilder’s “Little House” series and the author’s experiments in pioneer living, but it was much more. It’s the story of her obsession with all things Little House and her attempts to connect with what she calls “Laura World”; something like a Brigadoon for “bonnetheads” (her word for Little House fans).

The journey takes McClure to various prairie locations and museums, as well as a weekend spent with homesteaders who turn out to be obsessed with the End Times. She learns to grind wheat, bake some seriously rustic bread, and churn butter. (Which, she notes with disappointment, is just butter. I was personally relieved when our own attempts at butter-making yielded actual yummy butter and not some goopy mess. But I digress.)

Interwoven with the anecdotes and travelogue is a kind of memoir, a description of McClure’s attempts to figure out why connecting with “Laura World” matters so much to her even as she takes an elaborate series of road trips. The part where she finally figures it out, toward the end of the book, especially resonated with me.

Though McClure grew up reading and loving the “Little House” books, she only became re-obsessed with them after her mother’s death from cancer in 2007. She freely admits that her mother wasn’t anything like Ma Ingalls. But when she reads Laura’s account of when a well-to-do neighbor offers to take young Laura off Ma and Pa Ingalls’ hands, it all comes together:

“[Laura] wrote that it had made her feel strange and frightened. ‘It seemed to be possible that I could go on being me – Laura Ingalls – even without Pa and Ma and Mary and Carrie and Grace,’ she’d said. It was a strange way to think about being alone, but it made perfect sense, and I’d suddenly remembered it, and remembered that my mother was gone, and how was it possible that I could go on being me?”

I have had many of those moments myself. My own mother died in July 2010 of esophageal cancer, and suddenly it seemed that all the memories I had of her and me were imperfect. Thinking back to summer mornings we’d spent at my grandmother’s house, sitting at the table together while we shelled peas or shucked corn or snapped green beans, I realized that I am the only person alive who remembers certain memories. And that makes them run the risk of being imperfect, and if my memories aren’t correct and no one’s around to help me remember them correctly, then how is it possible to go on being the same me?

McClure marvels at Laura’s ability to describe her surroundings, to set a scene as if it is always happening now, and maybe that’s why she felt she could reconnect with Laura, even though the characters in the books are all long gone and Charles and Caroline Ingalls have no living descendants. Another thing I especially liked about the book was the way it compares the fiction of the Little House books with the facts. Such as: Charles Ingalls apparently settled in Indian territory in hopes that it would become eligible for homesteading (it didn’t); and Pa and Ma each had two other siblings who married each other. That’s three couples from just two families.

Once McClure realizes that she was looking for something that Laura World couldn’t provide, she tells her boyfriend (now husband) that she’s home, that she’s finished with the “Laura trips.”

This is the kind of book that different people will react to in different ways. The fact that McClure and I are around the same age and both lost our mothers to cancer fairly recently made the memoir parts interesting in a way that they wouldn’t be to someone who wants to know how to churn butter or what sort of butter churn to buy. (For that, let me recommend Nicole Faires’ The Ultimate Guide to Homesteading: An Encyclopedia of Independent Living!)

Me, I think I will be borrowing the Little House books from my daughter’s bookshelf and paying a visit to “Laura World” soon.

Making homemade laundry detergent

Ever notice how certain things really drive up your grocery bill? And those are the same things you’re always running out of? For us, one of those items is laundry detergent. I have a family of five, and my 4-year-old son counts for two people when it comes to producing dirty clothes so it’s more like washing for six people each week. We go through the laundry detergent rather quickly.

My husband wondered if laundry detergent is something you can make at home. Good news – it is, and it works great! We saw several recipes online, but most of them include these three ingredients:

  • 1 bar of laundry soap (Ivory, Fels-Naptha, Octagon – the last 2 are available in the laundry detergent section of your local supermarket. Bet you never noticed!)
  • 1 cup of Borax powder
  • 1 cup of washing soda, such as Arm & Hammer

Here’s how to make your own laundry detergent:

  1. Cut up the bar soap into little chunks.
  2. Grate the soap chunks by hand, or run them in a food processor fitted with the “S” blade. (Wash the parts with very hot water afterwards so you won’t have soap in your food!)
  3. Once the soap is in little tiny pieces, mix it with the other two ingredients in a large plastic container. A large, empty Oxy-Clean container is the perfect size.
  4. To use, you only need 1 tablespoon of the detergent for regular loads and 2 tablespoons for larger or dirtier loads.

One batch of this soap can last us a couple of months, which is impressive. It dissolves well in any water temperature, and is good for high efficiency (HE) washing machines (which I have). And once you’ve bought the washing soda, Borax and several bars of soap, you can avoid laundry emergencies for months! This detergent also works very well on stains, especially if you also use Oxy-Clean for pre-treating stains.

I haven’t been as enthusiastic about all the DIY stuff we’ve tried (more on that in a future post), but this laundry detergent recipe is a keeper.


Book Review: “Hitty, Her First Hundred Years”

Okay, it’s not exactly homesteading-related. But it is old-fashioned fun, and a favorite among homeschoolers! And it can lead to several old-school hobbies and skills, from woodcarving to dollhouse-building to sewing.

Author Rachel Field won the Newbery Award in 1929 for her children’s novel Hitty: Her First Hundred Years. It’s the story of a hand-carved wooden doll who has various adventures in history, like traveling on a whaling ship, staying with missionaries in India, “living” with a little Quaker girl in Philadelphia who goes to see a famous opera singer (Adelina Patti), and much more. History unfolds through the eyes of this little wooden doll, who many times remarks that she’s lucky to be made of resilient mountain ash wood.

It’s poignant further on in the book when Hitty recalls her first owner, Phoebe Preble, and muses that she’d be an old woman at that point…and later, that she would have already passed on.

I read this book about 30 years ago, as a child, and always wished I could have my own Hitty. Unable to find my old copy of the book, I went online to order it. I was curious about how popular the book was now – I mean, it was pretty obscure 30 years ago, so who would remember it?

Lots of folks, as it turns out. I found “Carve your own Hitty doll” kits and wooden doll blanks, as well as the HittyGirls Yahoo! group for people who carve and collect Hitty dolls, an online Hitty museum, and many other resources. I bought some doll blanks, joined a Yahoo! group for doll carvers, and began my new hobby in earnest. I discovered that there is a real Hitty doll behind the story (purchased from a New York antique store by the book’s author and illustrator, who were good friends), and that she’s in a library in Massachusetts (see her picture here).

My eldest daughter, meanwhile, read the original Hitty book at age 8 and loved it. It’s not easy reading, though: the book references people and, particularly, items of clothing that are no longer widely known. I had to look up what “dimity” meant, and I searched for Adelina Patti to find out more about the singer who was so famous in her day and virtually unknown in ours.

For younger kids, there’s an easier-to-read (but not true to the original) version of Hitty. Written by children’s author Rosemary Wells and gorgeously illustrated by Susan Jeffers, Rachel Field’s Hitty: Her First Hundred Years is a treat to read and enjoy. Hitty purists won’t like that it changes so much of the original story, adding new characters and adventures and leaving out old ones, that it seems odd to reference Rachel Field in the title. But I read the book, one chapter a night, to my three kids and they always begged me to read more!

There’s yet another (even simpler) series of Hitty-related books for grades 2-5, which I don’t have and haven’t read yet but which seem to be a fixture in many a homeschooling curriculum. They begin with a book called Hitty’s Travels #1: Civil War Days and the series also touches on topics like the immigrant experience at Ellis Island and the suffragette movement. I’ll probably end up buying these books both because of the (tenuous) Hitty connection and because I love to give my kids historical fiction.

I’ll be blogging about my adventures as an amateur doll-carver, too, but I wanted to start by introducing Hitty herself. If you love dolls and history, the original Hitty book is for you! (And your kids…once you’re finished reading it.)

Book Review: “Sewing for Children”

"Sewing for Children" projects

Glove bunny and "sock monster" from "Sewing for Children"

As part of our family’s homesteading, DIY philosophy, I am big into teaching my two daughters useful skills. At ages 9 and 7, they are already helpful in the kitchen and with doing laundry. And now I’m making sure they learn how to sew – so I was thrilled to find a book that makes it exciting and fun to learn this important skill.

I’ve read through many books of crafts projects for kids, and usually there are one or two things that might be interesting if I can track down all the supplies and the rest…meh. But “Sewing for Children: 35 Step-by-step Projects to Help Kids Aged 3 and Up Learn to Sew” by Emma Hardy – recommended by my daughters’ sewing teacher – is not that sort of book at all.

“Sewing for Children” is a book of sewing projects for kids aged 3 and up, with several levels of difficulty – from making simple wooden spoon puppets to creating a doll and her clothes. The projects are often useful (a sewing basket, a pencil case made from a cardigan sweater, embellished barrettes) and usually include the simplest of materials.

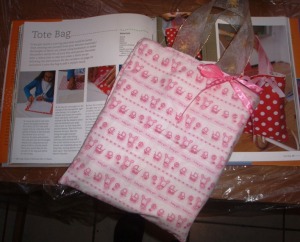
My kids have made several projects so far: Toy bunnies made from old gloves (great use for the ones that have misplaced their partner), “sock monsters,” hair ornaments, felt tiaras, a “magic wand,” and a tote bag.  They plan to make some of the costume pieces, too – they can’t wait to see their little brother in a pirate hat!

Even I am tempted to make the rag doll (once I get some Dolskin fabric) and the ladybug pincushion. The best part? My kids are learning and practicing several different stitches and skills like cutting patterns or gathering fabric, and it’s just plain fun for them.

The girls’ sewing teacher also recommended “Sewing School: 21 Sewing Projects Kids Will Love to Make” by Amie Plumley and Andria Lisle. If that book is as good as this one, I’m in.

Tote bag project from "Sewing for Children"

Tote bag project from "Sewing for Children"

What we wannabes love about homesteading, 2012-style

Looking around at other websites that talk about modern homesteading really impressed me with the range of things that it includes. You can be an urban homesteader, working a small garden into whatever space you have available and learning to cook more foods from scratch. At the other end of the spectrum, you can be a full-fledged, Laura Ingalls-style homesteader, buying some cheap undeveloped land in the middle of nowhere, building your own house, totally living off the grid and making or growing everything yourself.

Or you can be like us: somewhere in between. We’re a little extreme in that our kids go to a private religious school, we have no TV in the house, and “Wii” is something my 4-year-old son does on the bathroom floor sometimes (we’re working on that). Though we live in an apartment now, the house we’ll be living in once we move back Down South is a sprawling place with a woodshop and ample land for growing a decent-sized garden.

We’ll have a chest freezer (already there, thanks to my husband’s grandmother not needing it anymore), and I plan to fill that joker up with meats, soups, sauces, bread and cakes…all the things my current apartment freezer (the tiny kind that comes on top of a fridge) doesn’t have room for!

And there are offices/studio space for both me and my husband. I can get back into oil painting, go further with my woodworking and dollmaking, and finally have a place to set up my sewing machine. With more room to be creative, some of those side projects might just turn into a side business.

So what homesteading means to me and my family is a return to the kind of old-fashioned practices that give you more (and healthier) food for less money, and help you make the most of the time, resources and living space you already have. It means practicing self-sufficiency the way we remember our grandparents did, and passing those skills on to our children. And maybe, sometime in the near future, it will even include owning chickens and possibly goats! (One step at a time.)

How to choose a pressure cooker

Buying a pressure cooker means reconnecting with a classic cooking tool that saves time and money. I’ve used several and learned from my mistakes! Here’s how to pick a pressure cooker according to brand, size (for your family and intended use), materials, features and accessories.

Aluminum or Stainless Steel Pressure Cookers – Which is Better?

Though the link between aluminum cookware and Alzheimer’s has been shown to be a myth, I made the switch to stainless steel pressure cookers years ago and haven’t regretted it. Stainless steel pressure cookers are easier to keep clean and don’t absorb odors and flavors as readily as aluminum pressure cookers do. Plus, aluminum is a softer metal that pits and stains, and doesn’t have as long of a life as stainless steel does.

Aluminum is a better conductor of heat than steel is, however, so most higher-end pressure cookers have layers of aluminum on the bottom of the pot to help conduct the heat more efficiently. The best of both worlds!

Pressure Cooker Safety Features to Look For

Any pressure cooker should have the following features for safety and convenience:

  • A pressure regulator indicator: This can be either the traditional “jiggle-top” pressure indicator or a spring valve that pops up. Just read the manual to make sure that the pressure is 15 psi, the most common pressure used in pressure cookers (and pressure cooker recipes) and the pressure setting most likely to save time cooking.
  • Handles on both sides of the pot for safer lifting.
  • A pressure release setting, which is handy for quick de-pressurizing – just watch out for the steam! (If a pressure cooker doesn’t have the quick-release feature, simply place it in the sink and run cold water over the lid to release the pressure inside.)

Older pressure cookers may not have safety features or may not be in the best structural condition (especially if they are aluminum), so even if Grandma’s pressure cooker holds fond memories, choose a new model to use instead.

Pressure Cooker Accessories

Most pressure cookers come with a few accessories, but even if these items aren’t included, they are very good to have on hand:

  • A spare gasket (the silicon or rubber ring that fits in the lid).
  • A clear glass lid to use with the pressure cooker pot when pressurizing isn’t required (comes in useful for cooking chicken and dumplings!).
  • A cooking rack that allows foods to be cooked above the liquid in the pot.
  • A steamer basket for cooking vegetables in the pressure cooker.

It’s also good to have a well-reviewed pressure cooker cookbook / recipe book or two, although pressure cooker recipes and pressure cooker tips are easy to find online.

What Size Pressure Cooker to Buy

For most families, a 6 quart (or 6 liter) pressure cooker will do just fine – it provides plenty of room to cook a chicken or two without being overly bulky or heavy.

Are Electric Pressure Cookers a Good Choice?

Maybe, maybe not. There are several reasons why a traditional, stainless steel stove-top model of pressure cooker is better. Electric pressure cookers:

  • Have a shorter life expectancy than non-electric pressure cookers.
  • Don’t reach pressures as high as those of traditional pressure cookers.
  • Often have a non-stick coating that can be scratched easily and flake off into food.
  • Have a shorter warranty, many times, than high quality traditional pressure cookers.

For all those reasons, I think it’s better to stick with the old-fashioned stove-top pressure cooker. However, my mother-in-law received an electric pressure cooker as a gift and likes that it doesn’t take up stovetop space when she’s cooking for a crowd. So it really depends on your cooking style and your “druthers”!

Best Pressure Cooker Brands

There are many brands of pressure cooker, but these are some of the best-known:

  • American brands like Presto and Mirro pressure cookers, in aluminum or stainless steel, can be found in stores like Walmart and Target. These inexpensive pressure cookers can provide an introduction to pressure cooking and are good for occasional use. However, with weekly usage they may only last a few years. (I think I’ve had two of each over the past 15 years.) Plus, with less expensive pressure cookers, the vent tubes are often harder to clean.
  • Swiss-made Kuhn Rikon pressure cookers are at the upper end of the price spectrum and are made from stainless steel, reliable to use and beloved by cooks everywhere. They also use less water than cheaper brands because they conserve steam well.
  • An excellent mid-range pressure cooker – and one that’s easy for beginner pressure cooker chefs to use – is the Fagor Splendid pressure cooker. Fagor products are Spanish-made, quiet, dependable and fairly affordable – and will last for years. I bought my Fagor stainless steel pressure cooker several years ago and it is still going strong with its original gasket!

One last piece of advice for choosing a pressure cooker: the “jiggle-top” pressure indicators, though they are traditional, are also easy to lose or misplace. (No need to ask how I know that…let’s just say I’m happy my current cooker has the pop-up indicator instead.)

Once you have purchased your pressure cooker, you’ll find it useful for making chicken soup, quick-soaking dry beans (useful if you run out of canned beans and the closest store is miles away…or you’re snowed in!), and cooking other meats and veggies quickly and in a really flavorful way. Enjoy!

How to make chicken soup in a pressure cooker

I want to add a lot of good family recipes here, and I figured I’d start with my good basic chicken soup! This recipe (and the Chicken and Dumplings you can use it in…recipe to follow) has been in my husband’s family for about a hundred years, and when I wanted to learn to make it my mother-in-law said she’s teach me…after I bought a pressure cooker. A pressure cooker not only cooks chicken soup in about half the time of conventional cooking, it also locks in the flavor much better than boiling the chicken in a regular soup pot does.

Well, I’ve been through several pressure cookers in the past 15 years, and I would recommend buying a good one – not the Wal-Mart cheapies but something durable, like a Fagor or a Kuhn-Rikon. Some of the Presto pressure cookers are also good. As far as size goes, a 6-quart pressure cooker is just the right size for my family of five. Anyway…on to the recipe!

Making Pressure Cooker Chicken Soup

Chicken broth forms the base of many other soups and stews, so it’s useful to have a few containers of broth in the freezer – especially during cold and flu season!

To make a rich, golden chicken soup in a stove top pressure cooker, just follow these three easy steps:

Step 1: Cook the Chicken

To make the best chicken soup, choose either a pack of chicken breasts (bone-in) with very fatty skin or a quartered whole chicken. A 6-quart pressure cooker can easily fit two chickens inside, or two packs of breasts – so portions of the soup or broth can be frozen for future use.

Place the chicken in the pot and fill the pressure cooker with water to the maximum fill line. Put the lid on the pressure cooker and seal it. Heat the pot on medium-high until the pressure builds enough to make the pressure indicator jiggle or pop out (depending on the type of indicator), then turn the heat to low for 20 minutes for one chicken (or 1 package of breasts), or 30-40 minutes for two chickens. (Don’t worry – it’s hard to overcook it!)

Step 2: Cool the Broth and Separate the Chicken

Turn off the heat and let the cooker sit until the pressure drops enough on its own to open the pot, or run cold water on the lid to speed up the process. Once the soup has cooled enough to work with it, remove the chicken pieces with a slotted spoon or strainer.

At this point the cooked chicken can be used in another recipe – my kids love it in a simple dish with sliced kielbasa sausage, sauteed onions, white or basmati rice and olive oil. Or for chicken soup with the chicken in it, as opposed to broth alone, simply separate the meat from the bones and skin and add the meat back into the broth.

If any of the soup is to be frozen for future use, do it at this point before adding any vegetables, herbs or bouillon – so the soup will taste fresh even after the broth has been frozen. I also freeze a small, pint-sized amount of broth for use in sauces such as Chinese stir-fry recipes.

Step 3: Add Herbs, Vegetables and Spices

For a fragrant and flavorful soup, add some water and vegetables such as carrots, parsnips, garlic and onions (or no veggies at all), spices such as dill and parsley, and of course salt and pepper.

It’s also fine to add a chicken bouillon cube or a tablespoon or two of chicken soup mix, but the beauty of home-cooked chicken soup is that it doesn’t require artificial flavorings and colorings, loads of sodium or MSG. Usually, fresh herbs and veggies, salt, pepper, and maybe a dash of garlic powder and onion powder will do just as nicely.

So that’s it! All you need to make homemade chicken soup, and it doesn’t even take all day.
Getting closer to homesteading, one DIY step at a time

This blog will be about my family’s experiments in DIY homesteading – creating a more sustainable existence, growing more food ourselves, reducing and reusing and recycling and the whole nine yards. We’ve lived in an overly-expensive part of the country (NY state) for 11 years now and are moving back to the Mid-South in summer 2012. There we’ll have a big house in a rural area, with lots of land, and pay less than we do for rent in our 3-bedroom apartment.

And to get ready for the Big Move, we’re learning to do a lot of things ourselves. Like making our own laundry and dish detergents; sewing; doing arts and crafts with the kids to teach them basic skills and have cheap fun. (We have a no-TV, no-video-game home.) I’ve taken up woodcarving and my hubby wants to make furniture…or guitars!

Of course, not all of our DIY experiments turn out exactly as planned. Some work great and others…somewhat less than great. But we keep trying.

On this blog, we’ll review what worked and what didn’t, as well as the books we’re reading to prepare us for the adventures of gardening and keeping chickens. We’ll talk about our favorite kitchen gadgets and tools and whatnot. And we welcome advice from other wannabe homesteaders!

Hubby and I both remember working in the garden, lots of home-cooked foods, and the sight of our grandmothers canning their own vegetables and soups. Luckily for us, we’ll be living near my in-laws, who already grow much of their own food – and my mother-in-law, who introduced me to the magic of pressure cookers several years ago, wants to get back into canning.

We hope our experiences will help others who want to get closer to the land, closer to their families, and enjoy the sense of security you get from a fully-stocked pantry and freezer and a garden full of veggies.